Monday, July 12, 2010

Skein 1 Complete

    I finally finished my bamboo top! Its roughly 200 yards of 100% bamboo top spun into a nice lace weight. It is currently undyed but I have some big plans for it. I was going to ply with a thinker yarn and do some two tone colors, but I really like the thickness as it is now and might just keep it. I could maybe start working on one of the shawls in my queue.
 I'm really happy with the way this skein turned out. Its probably the most consistent yarn I've spun up to this point and I love the feel of the bamboo fibers. Its hopefully going to dye up great and I'm thinking about doing a berry purple color on it. I have 6 o.z. of bamboo left and I think I'll spin them all up and dye the lot together.
I'm spinning for teams Spindlers and Rookies for the Tour De Fleece and I'm so excited to be able to post my first complete skein of the tour. I've got roughly 11 more o.z. to go and if I'm going to finish on time I'm seriously gonna have to step up my pace. For the last leg of the TDF I'm going to spin my Tie-Dye merino top. For the last part of the tour on July 25th we are supposed to spin something difficult (since the corresponding leg of the Tour De France is the most difficult part of the race) so I'm planning on spinning up my tie-dyed merino top. I found that it seemed to have gotten a little matted during the dyeing process and is difficult to draft. I think next time I dye merino roving I'll use a different method and hopefully avoid the matting problem.

Saturday, July 10, 2010

Sunshine Dyeing

Yesterday I decided it was such a beautiful day that I would do some dyeing outside. I had about 2 o.z. of merino top left over from my last dye and I had the urge to do some tie-dye inspired fibers.

I did my dye today with some basic food coloring! Easy to clean up, great colors, and the fibers dye up really well. Soak the fiber in a 1 to 1 solution of vinegar and water for a couple hours. After that I just took a few containers of hot water and dropped some coloring in them (Make sure you test it on a fiber sample then go a shade or two darker. The color lightens a bit when it dries).

Since I was dyeing outside, I figured I would let the sun set the color for me. To help the natural heat source along I put some foil down and wrapped up the merino when I finished with the color. The purple highlights turned out really cool.
 All finished!!! Got just the tie-dyed look I was going for. This should spin up really well. I like working with food coloring for dyes. They give this great muted tone that looks wonderful as a yarn. For more vibrant colors though I like fabric dyes.

On another note, its day 8 of the Tour De Fleece and I''m hoping to finish up the last of the bamboo top  today. I'm driving upstate today to visit my parents, I'm sure I'll have a little extra time so my spindle will come along with me.

Wednesday, July 7, 2010

Tour De Fleece 2010 -- Day 4

    I joined the Tour De Fleece a little late, but better late than never right? I'm spinning for teams Spindlers and Rookies. On Day 3 (when I did actually join) I did all the drafting of my 9 oz. of bamboo. 9 oz.!!!!! That's a lot. A lot more than I normally would buy. Let me tell you the story of the 9 oz. of bamboo top. Several months ago I went on a mini shopping spree at my favorite place to buy fibers (The Yarn Tree in NYC) and bought a ton of stuff during their fiber sale. I think I bought 20 oz. total of bamboo, flax, merino and alpaca. So I supposedly finished off all that and recently bought 4 oz. more of bamboo and 4 oz. of merino for the tour de fleece.  I distinctly remember polishing off that bag of bamboo. Turns out, I was wrong. Whilst digging through my stash for some leader yarn I found the entire 5 oz. bag of bamboo, completely untouched! How did that happen!!?? Well, I'll just add that to my challenge for the Tour. 13 oz. total spun by the end.
Not the best picture in the world, but I didn't get home until after dark. The yarn on the spindle is right around a lace weight and I plan on plying it up to a 3 ply yarn.
 
The fibers are already speaking to me! And what they are saying is....PURPLE! I've got this beautiful picture in my head for what this yarn is going to look like. I'll dye each of the plys separately, hopefully that will happen in the next day or two.
Haha, Simba decided to try and eat some of my fiber. Bamboo seems to be his favorite. Kat likes the merino better. What a goof!


Tuesday, July 6, 2010

Review! Gotta Have It


The Knitting Answer Book
By: Margaret Radcliffe
ISBN-13 : 978-1-58017-599-9

This little book is a reference guide for literally hundreds of techniques. Unlike so many other reference books, this one provides clear concise directions (with pictures too!) with an air of fun and whimsy. This little book has a permanent place in my knitting bag and I literally never leave home (with my knitting stuff) with out it. It covers everything from needle sizes, yarn weights, terms and abbreviations advanced techniques like garment shaping and button holes to beading. The thing that really sets this book apart from the rest is the wealth of tips and tricks it gives in every chapter. I was surprised when the book fell open to a page with detailed instructions for making a string tool for beads out of fishing line or dental floss. I was even more impressed when I found the section adjusting patterns and fixing garments after you have finished them!

Hands down. This book is one of my favorite reference guides and I recommend it to anyone (beginner or seasoned knitter) to keep in their bags at all times. You never know when a problem will pop up and I can assure you, this little book, just like the cover says, has a solution to every problem you'll ever face.

You can find the book for purchase HERE at Amazon.com.
Definitely worth the money.

This book has been officially added to KnitSpiffy's favorites list.

Monday, July 5, 2010

Needle Organizer

Use this very "knitter friendly" pattern to store all your needles in a handy organized roll that you can take any where!


You Will Need:
1 19"x17" rectangle of fabric in pattern/color of the outside of your wrap
1 19"x17" rectangle of lining fabric
1 19"x10" rectangle of lining fabric
1 19"x8" rectangle of lining fabric
22-24 inches of fabric ribbon
A sewing machine


Please note that the pattern allows for a total of 1/2 inch for hem on all sides. Start with a very thin hem with your first piece and work your way to a total of 1/2 inch (about .16 inch for each seam)


Honeydew Melon Flavored Yarn

Honey Dew Melon
Handspun
100% Merino Top
148 yds (2.8 oz)
1 skein

Finished this yarn a few days ago and am just now getting around to taking pictures. The picture is a little blurry, sorry, my camera wasn't cooperating with me. I only did one skein since I didn't really have a project in mind but I just had to get the color out. 

I've still got 4 oz. of bamboo top and about 2 oz. of merino to spin still.

Monday, June 28, 2010

Cascade Yarns
Sierra
80% Pima Cotton
20% Wool
Teal (Color 434 -- Lot No. 1732)
100g/3.5 oz per skein
191 yards


(I'm using 5.0mm needles U.S. size 8 i think from knittingneedles.com in a 17sts/22 rows guage)

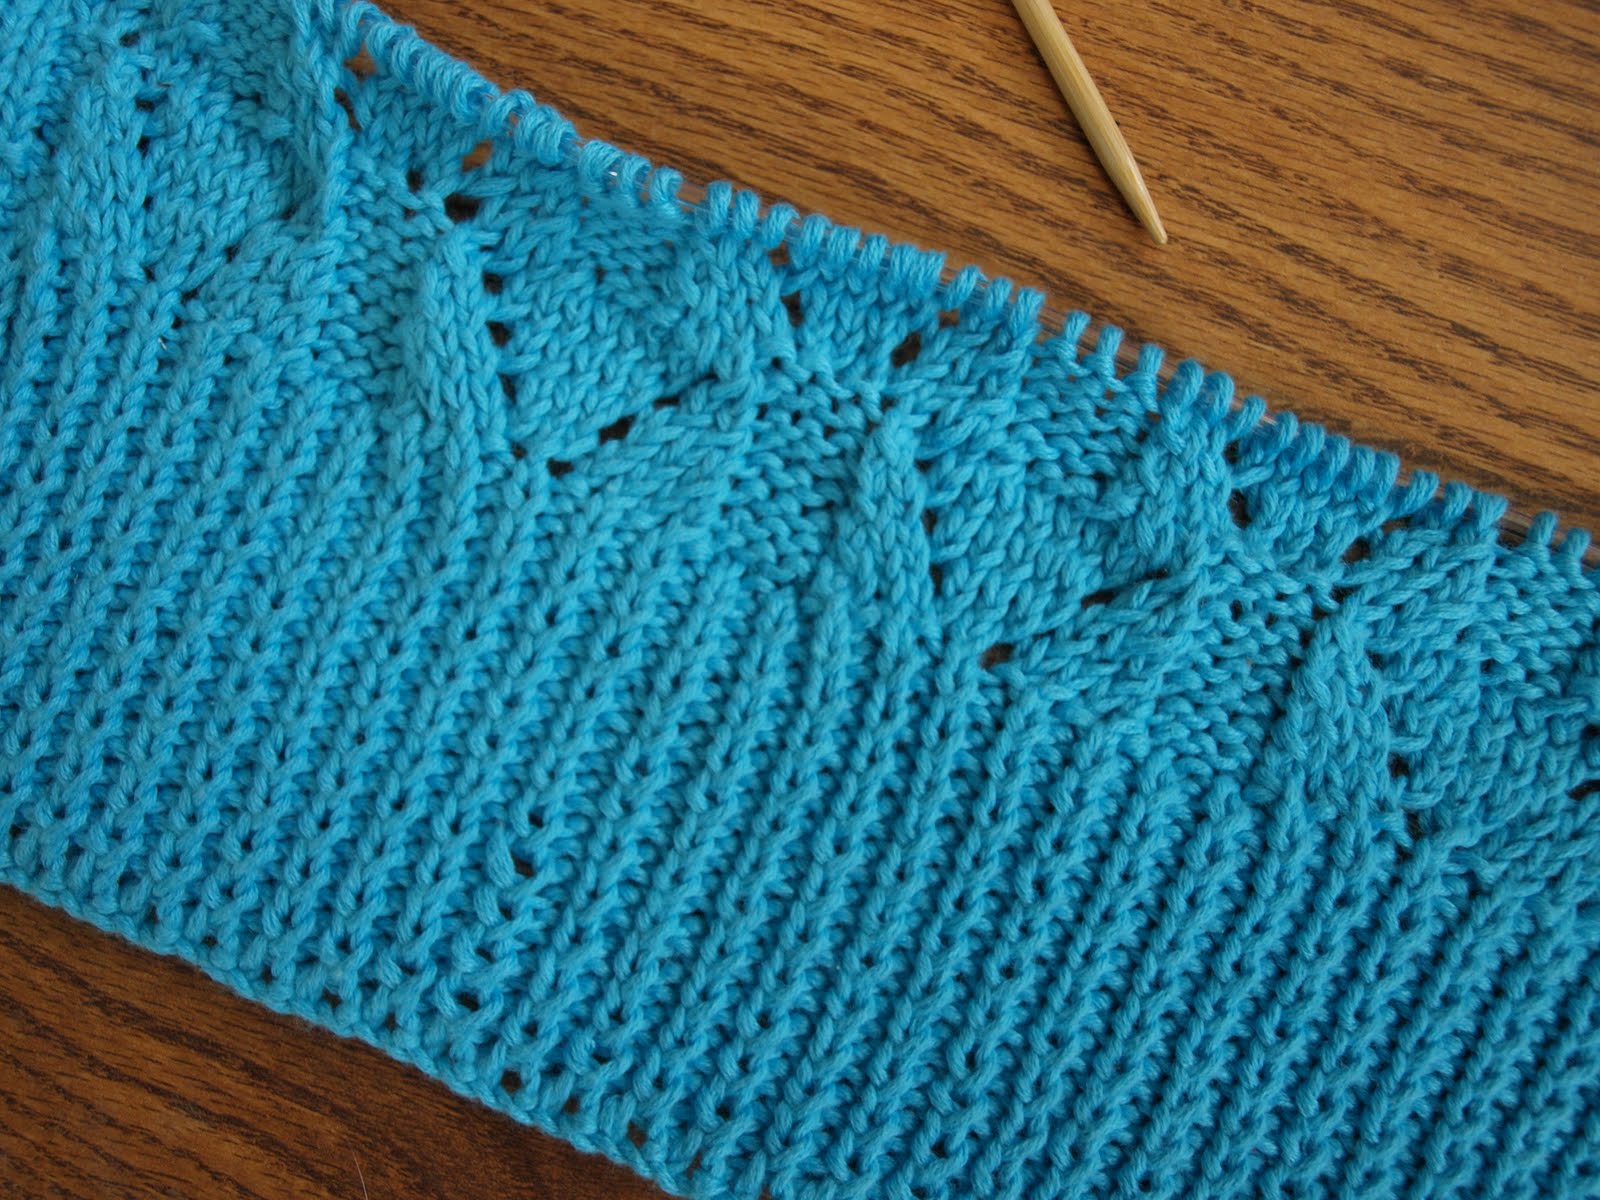
     I'm off to a good start with my Girl Friday Cardigan. The fabric is turning out beautifully, except for the snagged stitch in the 5th row of the ribbing (Thanks to my kittens whom were fighting over the fabric while I was cooking dinner). The pattern is pretty easy to memorize, and knits up fairly quickly. The biggest problem I've had so far has been right at the beginning (yes, in the ribbing ><) attempting to get perfectly even tension among my stitches. I had to rip out, re-cast on and re-knit the first few inches of the ribbing several times. I think I did it like 4 times. Finally I just threw my hands up and decided I had to get this started so to hell with tension. Turns out, that was the right move and I was able to produce even stitches that met my standards. That snag in the middle is glaring at me though. Darn you Kat and Simba!!!! I hope I can fix that up during blocking.
     After a few repetitions of the pattern it was easily memorized and not too difficult to knit. So far, this project is going fantastically. I started with the back piece (Shown in the first image) using the number of stitches of a medium sized cardi (81 stitches). This piece will be fantastic to have for the fall as part of my "back to school" collection. I deliberately used a yarn that was on the light side (the yarn I actually used was equivalent to a light worsted weight) made up of mostly Cotton, blended with with a touch of wool. I want this cardi to be wearable with jeans and comfortable enough to wear all through the fall. Speaking of the yarn, I am reminded of the month long search I engaged in to find the perfect yarn for this. My "stash" is literally overflowing and my boyfriend has literally forbidden me from bringing home another inch of yarn. With this being said I had to get ride of a couple balls before I could buy the yarn for this project and even then when I brought my bag home I was met with "More yarn? Where are you going to put it hon!?" and I had to promise I would knit the cardi right away and use every last bit of yarn.  I rounded up a few of my least favorite yarn scraps and knit up several dish clothes that I gave to my mom and grandma, and kept a few for my own sink. They turned out to be surprisingly useful, a little boring to knit, since the pattern is super simple, but they look nice and are handy to have around the kitchen!

(Current Progress, about 9 inches in)

A really cool thing about this project is that it introduced me to the Knitted Cast On method. I knew (conceptually) how to do this cast on but I had never actually tried it. I have in the past, favored the traditional cast on but really fell in love with the K.C.O. and after this project will probably use it waaaaaaaay more often. Its nicely elastic and blends in well with the rest of the pattern and looks really finished. Because of this, I am going to feature a section on cast-ons in KnitSpiffy magazine in the the Fall edition.

(Knitted Cast On)

The Fall edition is going to be tons of fun! I've got a whole bunch of wonderful ideas ready, I'll give you a few sneak peaks here, but keep a look out for the zine in August.

Watch my progress at     http://www.ravelry.com/people/hfoolwm